

Day 2 — How to Choose a Domain and Set Up WordPress Automatically on Hostinger
Today we’ll go through one of the most practical steps — getting your SaaS project live on the internet. We’ll find the right domain, set up hosting, and install WordPress automatically using Hostinger.com
This is your first visible milestone — by the end of today, you’ll have a working website for your idea.
Step 1: Choosing the Perfect Domain Name
Before anything else, you need a great domain name — something simple, brandable, and clear. Your domain will be the first thing people see, so it must sound professional and easy to remember.
Here’s what I did myself. When I started looking for a name for my own project, I spent about 30 minutes brainstorming with ChatGPT. I initially thought about saasify.com, but it was already taken.
After experimenting with different styles and meanings, I finally came up with nocody.pro — short, modern, and instantly recognizable.
Take your time with this step — even though it seems small, your domain name is part of your brand identity. You’re building a real online business, so every detail counts.
 Tip: Ask ChatGPT directly for ideas.
For example: “Give me 25 short, catchy domain name ideas for a SaaS that helps automate small
business tasks.”
You’ll get dozens of ideas you might never have thought of. Once you’ve found a few good options, check if they’re available. Hostinger makes it easy to search for domains directly on their website.
If your ideal .com name is taken, don’t worry — .io, .tech, .pro, or .app domains are perfect for SaaS and startup projects.
Step 2: Buying Hosting and Setting Up WordPress Automatically
Once you’ve chosen your domain, it’s time to set up your website. Head over to Hostinger.com — it’s beginner-friendly and has a one-click WordPress installation.
Here’s the exact process:
1. Go to Hostinger → WordPress Hosting and select the basic plan (usually called “Premium”). It’s very affordable and perfectly suitable for an MVP stage.
2. During checkout, you’ll be asked if you already have a domain or want to buy one. You can register your domain right there — no need for another platform.
3. After you complete your order, Hostinger will ask: “Would you like to install WordPress automatically?”
Choose Yes, and fill out:
○ Your website title
○ Your admin email
○ Your login credentials
4. That’s it. Hostinger will automatically:
○ Create your WordPress website
○ Connect it to your domain
○ Configure the hosting environment
Here’s a WP theme I quickly installed, literally in 10 minutes, and you can see it right away. Of course, I’ll rework it later to make it ready for my MVP. So, it’s important for me to test it first, not create some complex product. Similarly, you should create everything quickly to test the idea and see if it works.
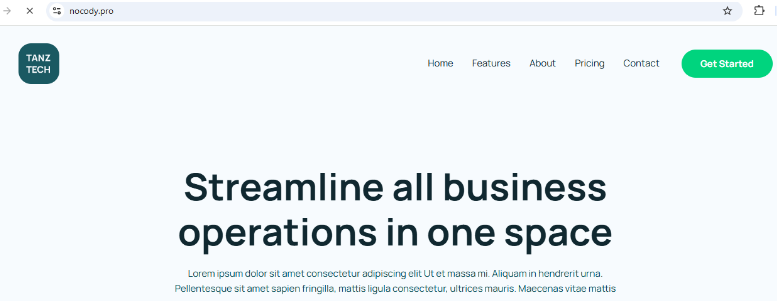
Here’s a WP theme I quickly installed, literally in 10 minutes, and you can see it right away. Of course, I’ll rework it later to make it ready for my MVP. So, it’s important for me to test it first, not create some complex product. Similarly, you should create everything quickly to test the idea and see if it works.
In about 2–3 minutes, your website will be live. No technical setup, no coding, no FTP uploads. This means you don’t need to hire a freelance coder to do anything complicated for you. We’ll install it quickly, test it quickly, and that’s it. Your website is installed and ready for you to quickly customize it to suit your needs—that is, your SaaS business.
Step 3: Check How It Looks on Every Device
Once your site is online, open it from different devices:
● On your desktop, to check structure and layout
● On your mobile phone, to make sure text and buttons fit the screen
● On a tablet, to confirm all sections are aligned properly
Inside the WordPress editor, click Customize → Responsive View to preview how your site appears across devices.
Remember — most of your visitors will check your website on their phones, so mobile optimization matters a lot.
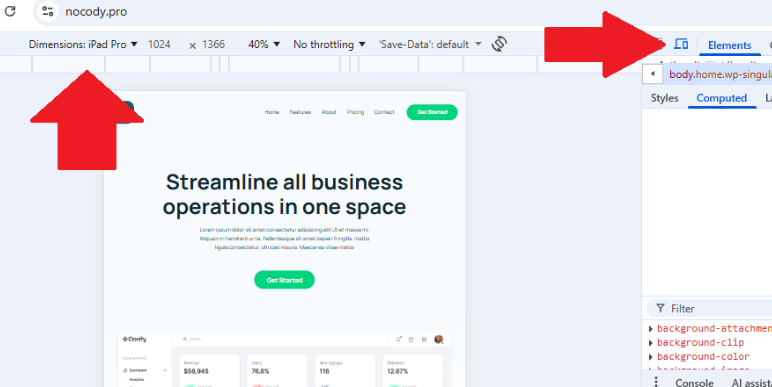
If you want to test how your site will look on different devices, open your computer’s browser (I use Mozilla), then press F12 on your keyboard. You’ll see a screen for testing different devices. Select “Mobile devices and tablets” on the right, and there’s a drop-down box on the left where you can select different devices. The example below shows how my site looked on iPad Pro after installing WordPress.
This skill will come in handy when you start editing sections on your website. Regularly check how sections appear on different devices after your edits.
Summary:
By the end of today, you’ve accomplished a lot:
 Found a great domain name using ChatGPT and Hostinger’s search
Purchased hosting and installed WordPress automatically
Chosen and customized a simple theme for your SaaS landing page
Checked that your website looks great on all devices
You’re now officially online! Your SaaS idea has its first real home — visible to the world.
Your next lesson awaits – it’s even more informative and valuable. Follow the link to continue.